How to make Vehicle Tracking System Using GSM + GPS and Arduino UNO


       In this video, we will learn about how to make an Arduino Based Vehicle Tracking System using GPS & GSM Module. Most of the vehicle tracking system available in the market is too costly. So, I decided to make my own Tracking System. The vehicle tracking system will send you the location to your mobile phone along with the Google map coordinate. You can request the location at any time & view the location on Google Maps installed on your mobile phone.


For this project, I have to select a proper low power GSM & GPS Module. So, I selected A9G GSM/GPRS/GPS Module. The device is very small and can fit anywhere & can be operated using a simple 3.7V Lithium-Ion Battery. The Board has a 32-bit ATSAMD21 controller from Atmel which can be programmed using Arduino IDE. You can also make this project using Neo-6M GPS Module & SIM 800/900 GSM Module with Arduino UNO Board. But this will make the device size large. We will discuss in detail about this Arduino GPS & GSM Based Vehicle Tracking System .


Working of the Arduino GPS+GSM Vehicle Tracking


After uploading the code, open the Serial Monitor. The Serial Monitor will display the initialization message. If the location is fixed Serial Monitor will display the Latitude and Longitude. If the location is still not retrieved, the Serial Monitor will still display Checking Module.

Now you can send the SMS to get the Location. So, on your mobile phone open the messaging app and then enter the phone number of the SIM used in the Arduino Zero board. After that, type the word “Location”, and then simply send it.


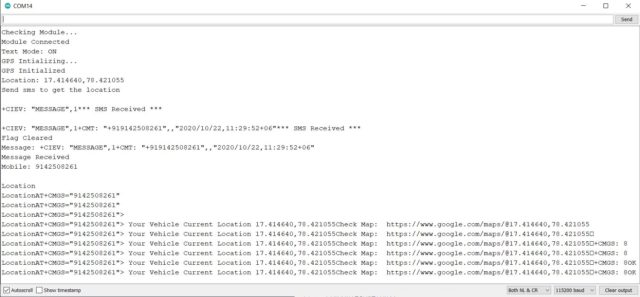
Within a while, the Serial Monitor will display the message received status and also tells about the date time, and mobile number. Similarly, you will receive an SMS on your mobile phone with the Latitude Longitude coordinate. Along with the coordinate, you will receive a link to google maps. You can click the link and open it either using google maps or using a Chrome browser.

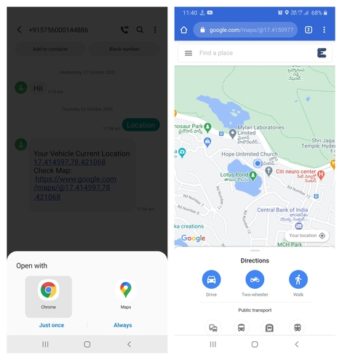
So, you can see it’s pointing to the same location where I am right now. This is really a great project and can be implemented in your vehicles for a vehicle tracking project. It can be used for controlling the theft of the vehicle. Or it can be used in finding the location of someone who is using your vehicle.

Source Code/Program

#include <TinyGPS++.h>
#include <SoftwareSerial.h>
#include<LiquidCrystal.h>
LiquidCrystal lcd(13, 12, 11, 10, 9, 8);
 
static const int RXPin = 4, TXPin = 3;
static const uint32_t GPSBaud = 9600;
// The TinyGPS++ object
TinyGPSPlus gps;
int temp=0,i;
// The serial connection to the GPS device
SoftwareSerial ss(RXPin, TXPin);
String stringVal = "";
void setup(){
  Serial.begin(9600);
  ss.begin(GPSBaud);
  lcd.begin(16,2);
  pinMode(13,OUTPUT);
  digitalWrite(13,LOW);
  lcd.print("Vehicle Tracking");
  lcd.setCursor(0,1);
  lcd.print("    System      ");
  delay(2000);
  gsm_init();
  lcd.clear();  
  Serial.println("AT+CNMI=2,2,0,0,0");
  lcd.print("GPS Initializing");
  lcd.setCursor(0,1);
  lcd.print("  No GPS Range  ");
  delay(2000);
  lcd.clear();
  lcd.print("GPS Range Found");
  lcd.setCursor(0,1);
  lcd.print("GPS is Ready");
  delay(2000);
  lcd.clear();
  lcd.print("System Ready");
  temp=0;
}


For more information DM on Instagram👇

(ABOUT ) Hello and welcome Main hu Aryan Pandey aur aap dekh rahe hai "TECHNO SAP" YouTube channel aur mere YT Channel par science se related videos upload krta hu. 🄸🄽🅂🅃🄰🄶🅁🄰🄼 👇🏾 https://z-p42.www.instagram.com/aryan...

Thanks for watching🙏🙏#TechnoSAP


Post a Comment

Previous Post Next Post